Saturday, July 28, 2012

Quilts at Sisters, Oregon

My husband and I went to Oregon last week to visit family.  After leaving the airport, we visited Multnomah Falls and then looked at the map to see which way to go to our destination.  I noticed that if we went out of our way a little (ok, maybe more than a little), we could go through Sisters - a well know quilting mecca.  Guess which way I chose!

We missed the outdoor quilt show by only a week (always on the 2nd Saturday in July).  This year they had more than 1300 quilts on display outside.  Unfortunately, this was the 1st year in their 37 year history that it rained and they had to quickly take the quilts down in the afternoon.  

They still had some quilts displayed inside local businesses and in a quilt store and fiber arts stores for the month of July.  Some had closed for the day, but I was lucky to go in a few.  I especially loved the Stitchin' Post owned by Jean Wells  (founder of the Sisters Quilt Show, quilt artist and author of many books).  Here are some pictures of my favorite quilts.


Two quilts designed by Sue Spargo.  Sorry I don't have better pictures, but they were hung high on the wall.  They are bright, beautiful applique quilts made of cotton and wool.


Here is a close up of one corner.  I love the cotton prints with the wool.  The colors are actually brighter than this picture shows.


Below are a few fun pieced cotton quilts.


Interesting design using the rail fence block.


Love the graphic nature of these 2 simple quilts.


Another Sue Spargo design.


Holiday quilts are so fun.


Some stunning landscape and art quilts - pictures don't do them justice.


A display of some of Jean Wells books and designs.

If you are interested in seeing more of her work, visit: jeanwellsquilts.com
If you want to know more about the quilt activities in Sisters, Oregon, visit:  sistersoutdoorquiltshow.org

Quilting Tip:  I asked Coleen, a friendly employee at the Stitchin' Post what her favorite quilting tip was.  She says she loves to use glue.  "Use glue in paper foundation piecing, when using small pieces and applique.  Don't be afraid of glue."  

I agree.  I've found glue to be very useful.  Just don't put any where you will be stitching and make sure it is a glue that washes out.  Washable glue sticks work, but I especially like the quilter's glue that has a small applicator tip.  Then you can get it right where you want it.  My friend Jill Finley makes "Appli-Glue" that is awesome.  You can check it out at:  jillilystudio.com/shop/AppliGlue.htm

Thursday, July 26, 2012

Juicy Grilled Hamburgers

What is summer without grilled hamburgers?  I'm not much for hamburgers unless they're homemade grilled burgers.  And those pre-formed patties won't do.  If you want succulent,
juicy hamburgers, you need to make the patties yourself.  Adding just a few ingredients that you probably already have on hand makes a big difference in taste and juiciness.


Just throw in an egg, Worcestershire sauce, oatmeal and seasoning salt.  Since a few of our sons have lived in Texas, we were introduced to Tex Joy Steak Seasoning Salt (has MSG).  If you have a friend or relative in Texas, have them send you some.  Another great seasoning salt is Tony Charchere's Creole (no MSG) seasoning which is very similar to Tex Joy but with a little kick.  If you don't have either, use your favorite seasoning salt.


Put all the ingredients in a large bowl.  Wash your hands really well and just squish all the ingredients together.  You can use a big spoon or potato masher, but that takes a lot longer - so just go for it.


When it is mixed well, form into a ball and press into patties  about 4'' wide and 1/2" to 3/4" thick.  Any thicker and they will be charred on the outside and not cooked on the inside.   It will make 8 quarter pound patties or make them thinner for a few more.  Get them uniform in size so they will all cook the same.  Place the patties on a cookie sheet lined with wax paper.  If you want cheese in them, form a thin patty, add a slice of cheese and top with another thin patty sealing all edges so the cheese doesn't leak out.  Delicious.
 
Place on a very hot grill and close the cover for 2-1/2 to 3 minutes until well seared.  Don't press down on the burgers - you want to keep all those juices in them!


Flip over, close cover and grill for another 3 to 5 minutes until cooked through to your liking.
  

Add your favorite condiments and serve immediately.  Enjoy!


Juicy Grilled Hamburgers

2 lbs ground beef                                       1 Tbsp Worcestershire sauce
1 egg                                                         1 tsp Tex Joy or favorite seasoning salt
3/4 c quick oatmeal

Pre-heat grill about 15 minutes before cooking to very hot.  Place ingredients in large bowl and mix together.  Place wax paper on a cookie sheet.  Form meat into patties 1/2" to 3/4" thick.  Lightly grease hot grill with small wad of paper towel dipped in oil held with tongs.   Grill patties for about 3 minutes on first side until well seared and 3-4 minutes on other side until cooked through.  Serve immediately with your favorite condiments.   Optional:  Add chopped onions, green or banana peppers, etc. to the meat mixture before making patties.

Thursday, July 19, 2012

Granny's Homemade Fruit Ice Cream


Did you know that July is national ice cream month?  President Reagan make the declaration in 1984.  That seems a good enough reason to me to make ice cream!  

My mom would make ice cream at pretty much every barbeque or get together during the summer as I was growing up.  Delicious fruit ice cream - all different flavors depending on which fruit was in season.  This is her wonderful, versatile ice cream recipe. 

To me it is a comfort food because it brings back so many good memories.  All 7 of us kids would keep listening for the motor to slow down.  When it would stop, my dad would always turn the container to see if he could get it going again for a few more minutes to make it as thick as possible.  We would gather around anxiously waiting for him to finally unplug the motor and dish it out to us impatient kids.  The paddle was the big treat because it would have chunks of fruit stuck to it.  He always got first crack at that and then would scrape off big spoonfuls and feed us like little birds huddling around him with our mouths open. 


I just had to show you a picture of the hand crank ice cream freezer my husband's family used when he was little.  I love it.  Someday if the electricity is out and we need some ice cream, we just may use it.


There are such beautiful berries available right now that I decided to make Jumbleberry Ice Cream.  I used raspberries, blueberries, strawberries and blackberries with raspberry Jell-o.


Pour the sugar, Jell-o and canned milk in a large pan.  Stir over medium heat until the sugar is dissolved, but don't boil.  It doesn't have to be that hot.  


Cool the mixture.  You can put it in the fridge or put it in the sink in an ice bath to hurry it up.


In the meantime, crush enough fruit so you have 3 cups.  I use a potato masher and mash it quite fine.  You can leave bigger chunks if you want.  Pour the fruit in the cooled mixture and also add the whipping cream.


Now it's time to pour the mixture into your ice cream container.  Put the paddle in and then add milk until the container is 2/3 full.  Don't add all the milk if it will make the container more than 2/3 full - remember the mixture will expand as it freezes and needs the room.  Don't worry about mixing the milk in, the paddle will do it for you as you start the motor.


Put the lid and motor on the container & turn it on before you add the crushed ice and salt.  You can use rock salt, water softener salt or even the salt you use on the driveway to melt snow in the winter.   Use about 8 cups of ice to 1 cup of salt.  Follow directions for your ice cream freezer to freeze - it generally takes 20-30 minutes.  Sometimes I plug it in outside because it is kind of noisy, but make sure you can hear it when the motor slows down.  Just like my dad, I turn the container by rotating the lid when it stops.  Sometimes the position of some ice will stop it.  If it keeps stopping after 10-15 seconds a few times, it is time to pull the plug.  It will be the consistency of a soft ice cream.


Isn't Jumbleberry a beautiful color?  And it is so creamy and delicious!  Serve immediately and if there is any left, go ahead and freeze it.


Granny’s Homemade Ice Cream
                            2 c sugar                                            3 c whipping cream
                            1 - 3 oz pkg Jell-o                                3 c crushed fruit
                            1 - 12 oz can evaporated milk               1 to 2 c milk
In large pan, mix sugar, Jell-o & evaporated milk together.  Stir over medium heat just until sugar is dissolved.  Do not boil.  Cool.  Can put in ice bath or frig to hurry cooling.  Add crushed fruit & whipping cream.  Mix well.  Pour into 4 quart ice cream freezer.  Add milk until container is 2/3 full.  Follow directions for ice cream freezer to freeze.  Makes about 4 quarts.
Here are some of my favorite combinations:  strawberry Jell-o with strawberries or strawberries and bananas, raspberry Jell-o with raspberries or a mixture of berries (jumbleberry), and orange or lemon jello with peaches (can't wait for peaches in the fall!)  Use your imagination!  I'd love to hear your favorite combinations.  Enjoy!


Friday, July 13, 2012

Cabbage Salsa

I love salsa.  I love all kinds of salsa.  I don't remember where I came across this recipe, but I remember thinking cabbage salsa?  What?  I tried it anyway and I'm sure glad I did.  It is delicious!  Even people who don't love cabbage, love this salsa.  It is addicting and guess what?  It is good for you!  Ok, maybe if you don't eat it with tortilla chips or frito chips.  


Look at all these wonderful veggies.  I prefer to use a hand food processor for salsas.  It makes them chunky without turning them into mush - and mushy salsa is not good.  I found my original one years ago at a flea market in Arizona.  I wore that one out and looked for another one.  I found a Tupperware one.  They are pricey as you know, but it was the only one I could find and I have to have one to make salsas!  Tupperware has a straight blade, and I prefer the curved blade on my original one, so I still use my curved blade.  The curved blade seems to cut through more easily.  If you find one - let me know!

You can use an electric food processor.  Just pulse a very, very few, short times.  You don't want salsa soup!

Put the cilantro, vinegar & sugar in the food processor.  Slice the cabbage, cut the onion in chunks & cut the jalapeño in small pieces.  Leave the seeds in & cut the slices thicker if you like it spicy.  This recipe is on the mild side, but make it hotter if you like.


Put the lime juice and all other ingredients except the cabbage in the food processor.


Process until you have small pieces.  (Remember - be careful with an electric food processor!)  Add a little of the cabbage if you need more bulk to get it to chop.


Add all of the cabbage & process until the salsa is in small pieces.  Serve immediately or within a few hours.  It doesn’t keep more than a day.  Once you put it out, it will be gone anyway.  That's it - enjoy!


Cabbage Salsa

¼ head cabbage                                            2 Tbsp cider vinegar                                   
6-8 sprigs cilantro                                         1 Tbsp sugar
½ onion                                                           juice from 1 lime
5-6 slices jalapeño pepper                            salt & pepper to taste

In food processor, add all ingredients except cabbage.  Chop finely.  Cut cabbage into chunks and add to processor.  Pulse till cabbage is in small pieces.   Be careful not to turn into mush.  Serve immediately with tortilla chips or fritos or refrigerate a few hours.  Stir before serving to distribute the lime juice. Makes about 2-1/2 cups.

Charm Pack Hourglass Quilt Pattern


I saw a very cute quilt a while ago made from the traditional hourglass pattern.  Since I have 4 baby quilts to make for my new 4 grandbabies, (yup, all 4 of my daughter-in-laws were expecting within 4 months of each other - how fun!) I decided one of them would be an hourglass quilt.  I was going on a friends quilt retreat and as I was going to pull some fabrics for the quilt from my stash, I noticed a charm pack I had in a tote.  It was perfect!


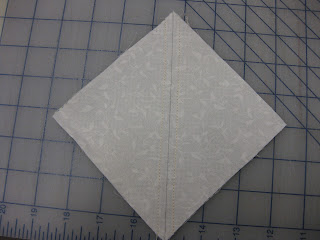
 1.  I chose a white background and cut that into 5" squares to go with the charm pack.  To make the blocks, with a thin pencil or fabric marker, draw a diagonal line on the wrong side of the background square.  Place a charm pack square right sides together to a background square.   Sew 1/4" on each side of the line.  Cut apart on line.  Press to the dark.  You now have 2 half-square triangles.


 2.  Cut the half-square triangles in half diagonally so you have quarter-square triangles with a colored & background piece on each side.


3.  Now take the matching sides of the triangles from the other squares, flip and sew them back together butting the seams in the middle to make 2 squares that look like an hourglass.  Repeat to make as many blocks as you need.


4.  Alternating the direction of the hourglass, sew squares together in a row and then sew your rows together.

That's all there is to it! You can add a border if you want.  I added a narrow background border thinking I was going to use my matching jelly roll as the outside border, but I didn't like it.  If I were to do it again, I would add a 2-1/2" to 3-1/2" finished background border.

So easy and you can make any size you want!  Just choose your quilt size and grab a calculator.  Take off the measurements of the borders and divide by 3.75" (the finished block size).  For example, if you want  a 45" x 60" finished quilt with 3" finished borders:
                      45" - 6" (3" borders on both sides) = 39" and 60" - 6"(borders) = 54"
                      39" divided by 3.75" = 10.4 so round up to 11 blocks in a row
                      54" divided by 3.75" = 14.4 so round up to 15 blocks in a row (you can round down if you want - because 3.75" doesn't go into 39" or 54" evenly, your quilt will be a little bigger or smaller)

11 blocks x 15 blocks = 165 blocks needed.   You need 1 charm piece and 1 background piece for 2 hourglass blocks.  165 divided by 2 blocks per charm piece = 82.5 so you need 83 charm pieces.  Check your charm pack for how many pieces are in it.  I've seen them anywhere from 30-42 pieces per pack.  And of course, if you don't have a charm pack, simply use 5" squares from your scraps or stash.

One more option - you can make the block any size you want.  Simply add 1-1/4" to the finished size block you want.  Cut the squares that size and sew using the same steps.  It is a darling scrap quilt!  Now time to cut my minky for the back and send it off to the quilter.